
Categories: Seattle fresh
Tagged: pike place, seattle food blog
Tagged: pike place, seattle food blog
Mark has been asking me to make something for Passover friends nonstop for the past week. SO tonight was the night! If you couldn’t already tell, I have a mega-sweet tooth going so I decided to make a flourless cookie. While trying to find the best recipe in the world, I ran across Smitten Kitchen’s Chocolate Walnut..the pictures are what lured me in :0)

Instead...Jack helped..always eager to lend a paw :0)
It was 9:30pm and knowing we didn’t have eggs, I asked Mark to “check the fridge” to see if we had everything (hehe). I was hoping he would discover the 1 egg and immediately offer to go to Saveway to pick some up. BUT after his hemming and hawing I gave in and decided to accompany him on the wild Saveway adventure. Pretty tame tonight…we got our eggs, dried figs (my recipe addition) and a Real Change paper :0)
So here is what you need:
2-3 cups walnuts, halved
1 cup dried figs, chopped
3 cups confectioners’ sugar
3/4 cup unsweetened cocoa powder
1/2 tspn salt
4 large egg whites
1 tbsn vanilla extract
Preheat the oven to 350 degrees and prepare three baking sheets with parchment paper.

Walnuts and dried figs
Spread the walnuts evenly over one of the baking sheets and pop it in the oven for about 10 minutes until the walnuts are golden. Let them cool and then chop them up!
In a bowl, whisk the sugar, cocoa powder and salt…then add the walnuts and figs. While whisking add the egg whites and vanilla until all the batter is moistened. It is important not to over mix as the mixture will stiffen.
Arrange the oven racks on the upper and lower thirds of the oven and reduce the heat to 320 degrees.
Spoon the batter onto the baking sheets in even mounds and bake for 15-17 minutes, until the tops are glossy but cracked. Make sure to shift the sheets halfway through!
Slide the parchment paper and cookies onto 2 wire racks and let them completely cool before enjoying!

Flourless Chocolate Walnut & Fig Cookies- Passover Approved!
Well, if you like sweet and rich desserts, you will love this one! Strawberry Lemon Cream Cheese Bars…super easy and a perfect bite-size desert when entertaining.

What I used
What you will need:
– 1 lemon cake mix
– 2 eggs, used separately
– 1/1 cup oil
– 1 package cream cheese, softened
– 1/4 cup sugar
– 1/2 of a medium sized lemon, juice and zest
– 10-12 strawberries, sliced into quarters

Spread/press the rest of the mixture evenly on a lightly greased 9 x 13 inch pan and bake for 15 minutes. Remove and then allow to cool.
Preheat the oven to 350 degrees.
Mix the dry cake mix with 1 egg and the oil until crumbly…reserve just over 1/2 cup- this will be used to bake on top of the bars.

Clean the strawberries
Spread/press the rest of the mixture evenly on a lightly greased 9 x 13 inch pan and bake for 15 minutes. Remove and then allow to cool.
While the crust is baking, beat the cream cheese, 1 egg, sugar, lemon juice and lemon zest until smooth.

Evenly distribute the strawberries on the crust
Evenly distribute the strawberries on the crust and then pour the cream cheese mixture on top.
Crumble the leftover cake mix evenly on top and then bake for an additional 20 minutes. Depending on your oven, you may want to bake a bit longer…until the top starts to brown lightly.

Crumble the leftover cake mix evenly on top and then bake for an additional 20 minutes.
Remove from the oven and allow to cool completely before cutting into the bars.

YUM! I personally can only eat one square :0)
YUM! I personally can only eat one square because they are so RICH, but I actually ate one for lunch today with a couple scoops of vanilla greek yogurt on top and it was a perfect balance for an afternoon treat :0)
Tagged: breakfast, dessert, food, fun, lemon cream cheese, people, seattle desserts, seattle food blog, sweet seattle
I always loved Old Spaghetti Factory’s Mizithra Cheese & Browned Butter Pasta when I was growing up and loved it even more when my mom would make it at home. Yum!
I introduced Mark to Mizithra a few years back and of course, he fell in love! This dish is super easy to make…there are only three ingredients- butter, Mizithra cheese and spaghetti, and from start to finish it takes about 15 minutes to prepare. SO if you are super hungry, you don’t have to wait long at all :0)

Finely grate the mizithra and melt the butter
This past weekend when I was shopping at the lower Queen Anne Safeway, I picked up a 1/2 lb of Mizithra cheese…you can buy grated Mizithra now but it does not taste the same as freshly grated Mizithra so don’t be LAZY! Mizithra is a dense white greek cheese that has a salty-mild flavor. It keeps for a while so it is great to have around the house when the pantry runs low :0)
What you will need:
3/4 cup butter, browned
1/2 lb Mizithra cheese, finely grated
1 pack of spaghetti noodles
First start preparing your spaghetti noodles making sure to salt your water.

Browning the butter is key!
While the noodles are cooking, in a small saucepan brown your butter. Over medium heat start melting the butter while stirring occasionally. As the butter starts to melt, it will foam and the color will change from yellow/cream to a golden/brown color (with a grainy appearance). You can also detect the browning by the way the butter smells- sweet and nutty.
Drain the noodles and then in a large bowl coat the noodles with the butter while tossing in the Mizithra! Enjoy!!

Mizithra a classic pasta dish ready in 15 minutes.
Happy Monday! As we plan dinners and desserts for the week I thought now would be a good time to let you know about our the category 5183 Miles. Posts in the 5183 miles category represent food recipes inspired by our honeymoon and travels.
For example I mentioned in my Prime Rib post; Cody, Wyoming was one of our stops during our month long honeymoon which inspired that meal…now here’s a picture…

Cody Theatre. The cowboy is very much alive in Cody Wyoming.
Tagged: cody wyoming, desserts, long honeymoon, prime rib, seattle food blog, travel, vacation
I nailed it (Prime Rib)! First let me say this post is more of a technique than an actual recipe…but you should get the general gist of how to be successful with cooking a prime rib.
Last Sunday I prepared Filet Mignon which is my favorite cut of beef…but for whatever reason I screwed up its searing and the filets turned out to be HUGE waste of taste, money and time. When I was traveling around the country with Ash for our honeymoon, one of our stops was Cody, Wyoming. Two things you should know about Cody…1) the cowboy is still very much alive and 2) they love their Prime Rib.
Though I never prepared prime rib ever, I just felt I knew I would need to nail it…since in our family my brother Dan claims to be a prime rib connoisseur and I wanted to recover from my flop from last weekend cooking beef.
On Saturday afternoon I went to Costco and bought a 5.5 pound Prime Rib Eye Roast for about $49.
I decided to cook this for all to see in the middle of Seattle aka my parents condo on 4th Ave. For those that do not know…my family is extremely hard to cook around/ with; and if you add my older brother to the mix forget it. You better be sure you know what you are cooking and how your going to cook it because they (family) all have an opinion 8)

Lit my cigar...just watching the temperature
Here we go…
First I heated the new radiant heat BBQ my dad bought to between 350 degrees to 400 degrees.
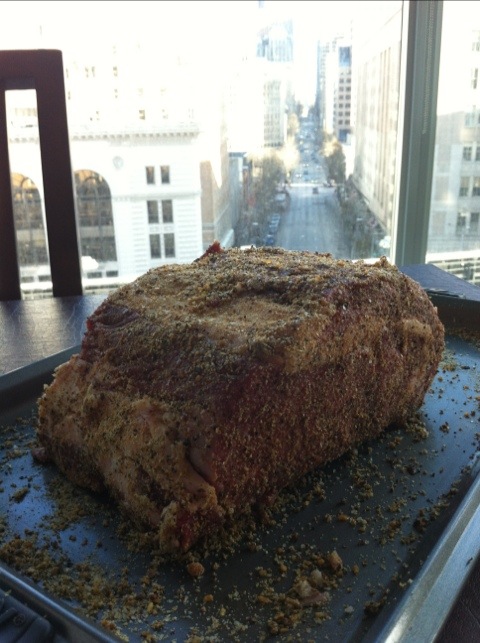
Next I trimmed about 80% of the fat from the top of the roast. Then in a seperate bowl I combined a bunch of spices to make a dry rub including: salt, lemon pepper, garlic, all spice, Italian herbs, sumac, onion powder, McCormick’s steak seasoning and the tiniest pinch of turmeric. Basically, whatever you want for a dry rub just no oil or butter (trust me).
I folded a quick tray from 4 sheets of tin foil and placed the roast on the tray. Then I inserted a meat thermometer into the direct center of the roast and placed onto the grill.
I lit my cigar. And made quick trips to watch the Sounders play San Jose.
Here is what I think cooking prime rib is all about…basically…its about 12 to 15 minutes per pound OR until the temperature in the middle of the roast reaches 115/120 degrees. In my case the cooking time was just 1 hour and 30 minutes…but then here is the key part…once you pull the roast from the grill…quickly and loosely cover with tinfoil for exactly 18 minutes! <– you have to wait this out…the roast is still cooking for another 5 to 10 degrees bringing it to the perfect medium – RARE.

Prime Rib roast 1/2 inch slices
Uncover and cut into roughly 1/2 inch slices. At 5.5 pounds you could easily feed 5 – 6 hungry people.
I made a little horseradish/ dijon mustard sauce.
I would have made an au jus sauce but the drippings from the roast sufficed this time. Next time definitely will.

Nailed it! Prime Rib from Costco...done!
The worst part about the prime rib roast was that Ashley, which was my inspiration was actually at a male choir concert, so she never got to experience the greatness!
Tagged: seattle food blog
Ratatouille…the gift that keeps on giving! We still had a ton of veggies leftover from Sunday’s feast…mushrooms, zucchini, squash, shallots, etc…and a bit of ground beef and goat cheese from Mark’s filet mignon, SO when I was at the lower Queen Anne Safeway this evening, I was really trying to come up with a meal that could incorporate what I had at home. We both agreed that we wanted something on the lighter side (which instantly ruled out our “go to”… pasta) so as I walked produce land, I ran right into 10 for $10 Assorted Bell Peppers. BINGO- Stuffed Bell Peppers!

Jack, guarding the ingredients...he washed his hands.
I knew Mark was not going to be all that excited about the traditional Stuffed Bell Pepper so I needed to get a little creative. I quickly did a little research to make sure I had all the ingredients I needed and literally walked out of Safeway with 4 bell peppers (yellow, orange, red and green), a bag of rice and a pound of ground turkey- trying to keep it healthy tonight :0)
On my way home, stuck in 2nd Avenue traffic, I started second guessing the rice. I really wanted to use the leftover chevre and for some reason the rice just felt a little heavy. While I was researching, I did find a great recipe that used couscous so I dropped by Paris Grocery and bought some couscous along with Smoked Red Pepper Sea Salt- a perfect spice for tonight’s meal!

Gut the bell peppers (removing the tops and seeds)
So here is what you will need…
Preheat the oven to 350 degrees.
Gut the bell peppers (removing the tops and seeds) and arrange them on a prepared baking dish (I used cooking spray). Pop them in the oven for about 15-20 minutes until they start to soften (you will see wrinkles on the side of the peppers), remove and set aside.
In a saucepan, bring the chicken stock to a boil and then add the 2/3 cup couscous. Let it sit on high heat for 1 minute and then cover the pan and remove from heat. Let the couscous sit for about 10-15 minutes, covered.

1st angle...
Meanwhile, on medium to high heat combine your beef, turkey, 1-2 garlic cloves, sea salt, red pepper flakes, cumin and black pepper. Brown the beef/turkey and drain excess oil. Set aside.
Heat olive oil in large skillet and add the shallot, remaining garlic, zucchini, squash and mushrooms. Stir continuously for about 5 minutes (until the veggies are soft) and then reduce the heat. If you think you might need more oil, just use chicken stock! Add the tomato, stir for 1 minute and turn off heat. Add the beef/turkey and couscous to the veggies and mix.

2nd angle...
Just before stuffing the peppers, crumble about 1/2 cup of the chevre on top of the mixture. Fill the peppers completely with the mixture, top with the remaining chevre and a layer of Panko bread crumbs.

the final plating. stuffed! ;0)
Pop them back in the oven for about 15-20 minutes and enjoy immediately!
I am not sure how I feel about the sliders we prepared last night…to be completely honest, I think I was chopped. I like my hamburgers medium well and all three could have used a couple more minutes on the heat. However, I do think my flavors were a bit more creative :0) – Bacon Blue Cheese, Swiss Shallot & Mushroom and Garlic Parsley…and I cleaned the kitchen (bonus points).

Here is what you are about to make: Oven-baked Sweet Potato Chips
To go with the sliders, I decided to make oven-baked sweet potato chips. I popped them in the oven a couple minutes prior to our 30 minute countdown and they were baked to perfection!
Here is what you will need…
2 – 3 large sweet potatoes, sliced to about 1/8-inch thick
2 – 3 tbsp of olive oil
sea salt, to taste
ground black pepper, to taste
Preheat the oven to 400 degrees and prepare two baking sheets by lightly spraying them with cooking spray.
Combine potatoes, olive oil, sea salt and pepper in a large bowl or plastic bag and evenly coat.

place potato rounds on the baking sheets. FYI...cut with a slicing mandolin.
Arrange the potato rounds on the baking sheets, spacing the slices apart. Pop both sheets in the oven and let them bake for about 30-35 minutes…until the potatoes are crisp and golden brown.
Remove the chips from the baking sheets and place them on a paper-towel to cool. Sprinkle with salt if you feel necessary!

Jack keeping me company tonight
Tonight Ashley and I decided to make sliders. To add a little bit of twist because we were hungry…we gave ourselves 30 minutes to prepare each other 3 sliders. We tried out a new video app called Social Cam. Here is the initial test video. The 30 minute version to come shortly.
